Considering current learning standards, we planned for a true STEM Center in which we truly highlight 21st century student skills and motivate their accomplishments beyond a traditional academic track. In our submission, we describe how the STEM Center was created including conception, construction, ongoing instruction, training and maintenance.
Entry Narrative
Note: A PDF version of the narrative is attached.
About our School
Beth Tfiloh Dahan Community School is a Jewish, co-educational college preparatory school; its purpose is to educate Jewish students from preschool through high school. The student body is diverse, including families with varying religious, economic, cultural, and social backgrounds. Beth Tfiloh Dahan Community School has been and continues to be unique in philosophy and curriculum, stressing the values and traditions of our rich Judaic heritage and American democratic ideals, while preparing students to meet local and global challenges of contemporary society.
As a school community, Beth Tfiloh strives for excellence in all areas. We distinguish ourselves from other independent schools with our dual curriculum and commitment to cutting-edge secular and Jewish studies. Though the leadership and direction of Dr. Zipora Schorr, this STEM Center is our latest project to enable students to learn in an unconventional advanced academic environment in which they can synthesize their knowledge with innovative technology and integrate various disciplines, all while learning the skills to perform and compete at the highest levels.
Introduction
At the first tour for the 10th grade chemistry class, a student exclaimed, “It’s a whole new Beth Tfiloh!” In fact, the creation of this STEM Center is an integral component of the vison of our head of school, Dr. Schorr, for 21st century learning. It has already been the impetus for new curricula, both within traditional science subjects and beyond. The various frameworks for 21st century learning include different criteria for the necessary skills, but all agree on four primary areas of focus and skills development: collaboration and teamwork, creativity and imagination, critical thinking and problem solving. In the transformation of our old woodshop into a high-tech STEM center for student work and innovation, we kept these learning skills at the forefront of our project design.
Traditionally, the space was called the “woodshop” and in fact, housed a band saw, jig saw and drill press that were used to support a traditionally taught engineering class that focused on constructing rudimentary walking robots. Although it had great utility for us, we envisioned creating a space for students to think, problem-solve and create. Based upon current standards for science and engineering we planned for a true STEM Center, one in which we can truly highlight student skills and motivate their accomplishments beyond those that are used as part of a traditional academic track. We are most gratified when a large majority of the bustling flow of student traffic in and out of the STEM Center are students from all academic tracks. Each enjoy the opportunity to learn experientially in this new space.
In this document, we describe how the STEM Center was created from conception, through construction, and finally ongoing instruction, training and maintenance. We focus on the best practices we have learned as we underwent the process of developing the center. We also provide a checklist of each step for other teachers and administrators to implement similar changes within their school. Throughout the document, we have included links to sample materials and student interviews about the projects they have been working on in the STEM Center.
Checklist
For schools preparing to take steps to starting a STEM Center, the checklist below can be used for planning your project. In the next section, we expand on each of these items during the design and creation of our STEM Center.
- Develop Learning Principles for the STEM Center – Expand on your school’s existing learning principles to identify goals for your STEM Center.
- Inventory Facility and Equipment – Make a detailed floor plan of your future STEM Center. Inventory existing equipment and materials that will be included in the STEM Center.
- Select Equipment – Decide what equipment you want in your STEM Center based on your learning principles, then analyze how that equipment is constrained by the layout of the room and space available.
- Iterate a Floor Plan – Create multiple floor plans. Iterate the floor plans with your learning principles in mind.
- Begin Renovation – Document the transition from the original space to the new STEM Center.
- Training Students – Develop training courses to teach students how to use the equipment. Each training course should unlock additional privileges to use more advanced equipment. As students’ expertise with the equipment grows, so do their STEM Center privileges.
- Curriculum, Clubs, and Interdepartmental/Interdivisional Projects – Integrating the STEM Center into curriculum, clubs and across departments and divisions is the most critical aspect of developing this type of space.
- Make a Five-Year Plan – Make a five-year plan that commits human and financial resources to the vision of your STEM Center.
Develop Learning Principles for the STEM Center
The learning principles set for the STEM Center are an extension of Beth Tfiloh’s learning principles (shown below):
- Clear and consistent goals. Teachers set clear goals and consistent expectations through ongoing written and oral communication, including use of assignment directions, study materials, and grading rubrics, all accessible to students and parents on school website.
- Derech eretz (respect) in all teacher-student and student-student interaction. Teachers display and model respect for the individual student, creating a safe environment in which students are encouraged to challenge themselves, and engage fully in the learning process.
- Flexible approach to teaching. Teachers use a variety of teaching approaches, including modeling, experiential learning, differentiated instruction and facilitative versus direct instruction, to maximize the learning of all students within the class.
- Challenging and rigorous instruction at all levels. Teachers create challenging and rigorous instruction for students at all levels, with high expectations aligned with the skills and developmental readiness of the students in the classroom.
- Ongoing assessment with feedback. Teachers use a variety of formative and summative assessments with timely feedback, and opportunities for reflection, to maximize the rate of skill acquisition and the depth and accuracy of conceptual understanding, as well as to guide the teachers’ own instructional planning.
- Team approach to education and development of students. Teachers communicate actively with students, parents, advisors, and administrators when concerns arise about a student’s performance. Academic Support personnel, both those on staff as well as those whom parents have privately employed, should be viewed as partners with the teaching staff in the learning process and, as such, should receive regular communications about how the students are doing and what the students should be working on.
Within this framework, we developed specific learning principles for our STEM Center. Based on each category above, we added principles that we thought were essential to the hands-on, student-centered aspects of STEM instruction.
- Clear and consistent goals. In order to provide clear and consistent goals to students, we wanted to develop training courses, so students understood not just how to operate the equipment but how to innovate with the equipment (see the final training documents discussed below). We reasoned that training courses would provide a clear path of privileges to use more advanced aspects of the equipment as students gained new skills.
- Derech eretz (respect) in all teacher-student and student-student interactions. For the STEM Center, derech eretz is two-fold, focusing on both physical safety and inclusion. First and foremost, physical safety in any lab environment is critical, and we already have a robust set of safety guidelines for working in laboratories or hazardous spaces (click here for our High School Science Safety Rules). Second, we wanted the lab to be inclusive of all learners. We wanted the STEM Center to welcome all students to enter its doors to make, play, learn and make mistakes.
- Flexible approach to teaching. Early in our discussions of setting up a STEM Center we decided it would be a non-traditional classroom. Instead of individual desks, we wanted a collaborative space where groups of students could sit together and face each other with enough space to spread out project materials.
- Challenging and rigorous instruction at all levels. One of the challenges of engineering curriculum, or any project-based instruction, is that not all students have the same ability levels with the different parts of the curriculum. We knew our instruction would have to connect with different learners at different levels and addressed this through the training courses we mentioned above and also planned projects for our course Introduction to Engineering Design such that student groups could move at their own pace with each project.
- Ongoing assessment with feedback. Ongoing assessment focused on the development of our Introduction to Engineering Design curriculum. It raised the question, “How do you grade project-based learning?” This is even more challenging when projects are designed to allow student groups to move at their own pace and each student group has a unique outcome. We are still working to answer this question but have developed some draft rubrics to guide in assessment.
- Team approach to education and development of students. A critical component to achieving the above goals is collaboration. First, collaboration must take place in the design of the STEM Center. Members of the design team included members from multiple divisions including faculty, facilities, security, technology, and development. Second, after the STEM Center was established, we wanted it to be a collaborative space for teachers to use for classroom projects in all disciplines. With that in mind, we worked to develop relationships with other departments and divisions.
Inventory Facility and Equipment
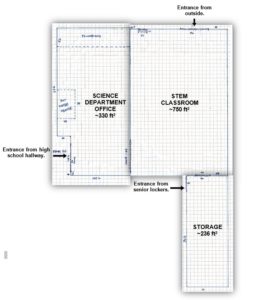
The process began with taking an inventory of our current facility and equipment. In our case, this included making a detailed floor plan of the existing woodshop, which was identified as the location for the STEM Center. An example of our initial sketch is provided below:
We also took an inventory of the materials we already had for the STEM Center. Since Beth Tfiloh had previously offered an engineering course, we already had many of the hand tools (saws, screwdrivers, files, plyers, soldering irons, etc) that we needed. In addition, we obtained a Makerbot Replicator 5th Generation 3D printer several years ago. With this first step, we began to plan the STEM Center.
Select Equipment
It may be a natural inclination to select equipment based on the layout of the room or the space available, but this is only one factor and not the most important factor. While the layout and space constrain the decision for equipment, the learning principles should be the primary factor for making decisions.
With our learning principles in mind, we decided upon the following pieces of equipment: 3D Printers, CNC Router (Carvey), Laser Engraver and Cutter, and shop tools. The shop tools include a drill press, jigsaw, bandsaw, belt sander, Dremmel tool and an assortment of hand tools. As students learn advanced methods (such as 3D CAD with Fusion 360, which is one of our training courses for students), they can go directly from “thought to thing” in this space. The total amount spent for three Makerbot Replicators, one CArvey and one Laser Cutter/Engraver was $32,582.00.
Iterate a Floor Plan
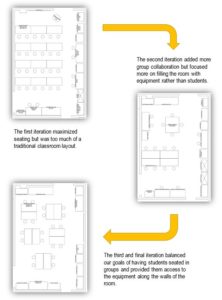
Much like the equipment selection, the floor plan should match the learning principles developed for the STEM Center. We chose to develop the floor plan using an iterative method. In other words, starting with a floor plan generated by one person, then each person on the development team making incremental changes until we all agreed on the design. Below you can see the development of the iterative process.
Begin Renovation
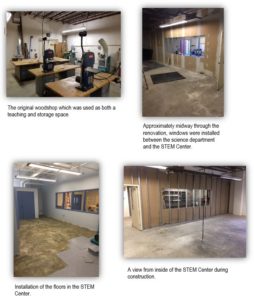
BT employed a contractor to completely renovate the space. Our role during the renovation was to document the transition from a woodshop/storage area to the STEM Center. The renovation took approximately two months.
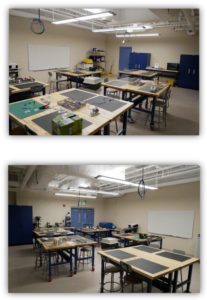
The final STEM Center renovation is shown below. Follow this link for a video tour.
Training Students
We created eight training courses to help students learn how to use the STEM Center. The courses are as follows:
Fusion 360 (30 minutes)
By the end of this course, students will be able to:
- Create a Fusion 360 account.
- Draft basic 3D shapes such as dice and a vase.
- Export 3D shapes in *.stl file for printing.
Makerbot Basics (20 minutes)
By the end of this course, students will be able to:
- Make a Makerbot User Account
- Download *.stl files from Thingiverse
- Slice *.stl files in Makerbot Print
- Start a print on a Makerbot.
- Remove a print from the Makerbot bed.
Makerbot Advanced (30 minutes)
By the end of this course, students will be able to:
- Create their own 3D design in Fusion 360
- Import *.stl files from Fusion 360 to Makerbot Print
- Adjust advanced slicing settings.
- Load and unload filament from the Makerbot.
Carvey Basics (20 minutes)
By the end of this course, students will be able to:
- Make an Inventables User Account
- Navigate the Easel interface.
- Fix a 6 x 6 piece of HDPE into the Carvey.
- Change the bit on the Carvey
- Create a design on HDPE
Carvey Advanced (30 minutes)
By the end of this course, students will be able to:
- Fix a piece of wood or linoleum into the Carvey.
- Adjust advanced depth and cut settings.
- Import an *.svg file to create a more advanced design.
- Use the Carvey to make a custom stamp.
Laser Basics (20 minutes)
By the end of this course, students will be able to:
- Operate the basics of the laser cutter including, powering on/off, using the ventilation system, laser calibration, and operating the software.
- Distinguish between cut, engrave raster, and engrave vector lines.
- Construct a basic wood or acrylic projects from laser cut pieces.
Laser Engraving (30 minutes)
By the end of this course, students will be able to:
- Make a *.pdf file for laser engraving, import it into the laser engraving software, calibrate the image to the engraving surface.
- Install the engraving surface and calibrate the laser height.
- Use the engraving software to choose a material and engraving depth.
Laser Cutting (30 minutes)
By the end of this course, students will be able to:
- Make a *.pdf file for laser engraving, import it into the laser cutting software, calibrate the image to the cutting surface.
- Install the cutting surface and calibrate the laser height.
- Use the cutting software to choose a material and cutting depth.
As an initial effort to get interested students trained, we offer two courses each week throughout the entire year. The courses are offered on a rotating basis with a preference to the “basic” courses, as they allow new students to gain access to the equipment in the STEM center.
Each student’s record of training is kept in the STEM Center in order to track their progress. Follow this link to see the student training record document which includes the STEM Center privileges a student attains after completing a class.
We also keep log sheets of student usage of the equipment. These are used primarily for safety, so we can track who is using the equipment. There is always adult supervision while the STEM Center is open, but keeping good documentation is helpful. Follow this link to see samples of the log sheets for each piece of equipment.
Curriculum, Clubs, and Interdepartmental/Interdivisional Projects
Curriculum
Our senior elective course, Introduction to Engineering Design, is our primary curriculum for the new STEM Center. The course is structured as follows:
- The Engineering Design Process – We adopt the engineering design process as developed by TeachEngineering.org (https://www.teachengineering.org/k12engineering/designprocess). The process is a set of cyclic steps that walk students through thinking like an engineer. In this unit, students develop process charts for various engineering tasks.
- Technical Drawing and Fusion 360 – In this unit, students learn the basics of reading a technical drawing (front, top, side, and isometric views). They also learn the basics of Fusion 360 (https://www.autodesk.com/products/fusion-360/overview), which is a 3D CAD design program. As a final project in this unit, they draft an everyday object in 3D and implement a unique design improvement.
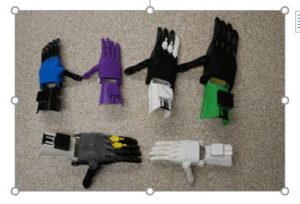
- Project e-Nable – Students participate in Project e-Nable(http://enablingthefuture.org/) and construct a prosthetic for a client using the 3D printers. In this unit students learn how to use the 3D printers and how to assemble a complex design. Follow this link for an interview with a student participating in the project.
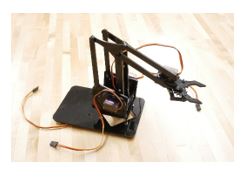
- Robotic Arm with Arduino Control – In this unit, students construct a robotic arm, wire it with servos, and program it with Arduino to perform a specific task. They also learn to use the laser cutter/engraver to cut the pieces they need to construct the arm. This project is based on a Thingiverse model of a robotic arm (https://www.thingiverse.com/thing:360108).
- Product Development and Marketing – As a final capstone project, students apply all of the skills they have learned with CAD, 3D printing, laser cutting/engraving, assembly, and Arduino electronics to develop their own product. They are tasked with finding a need within our school, collecting marketing data (surveying faculty and students) and then using the engineering design process to bring their idea into fruition.
Clubs
There are two clubs that primarily use the STEM Center:
- Robotics Club – The robotics club is new this year. It was created by a high school senior. He and his team decided to create a hexapod robot based on this model found on Thingiverse (https://www.thingiverse.com/thing:1080281). Follow this link for an interview with the robotics club.
- Rocketry Club – The rocketry club frequently uses the laser cutter to produce rocket fins and the 3D printer to make rocket launching platforms and nose cones. You can read more about the rocketry club on the BT website (https://www.bethtfiloh.com/page/news-detail?pk=1211299&fromId=243004).
Interdepartmental Projects
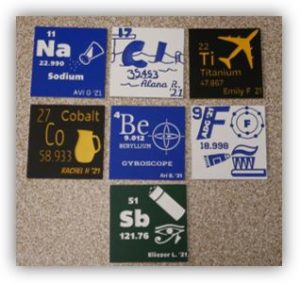
- Periodic Table – Our 10th grade students are currently working on a grade-wide project to create a 3-D mural of the periodic table, ordered and color-coded according to the trends of the periodic table. Each student is assigned an element on the periodic table, for which they need to design a tile depicting the element’s symbol and how it is used on a piece of 6 in x 6 in HDPE. Each student has been trained in using CARVEY and is able to design and produce their element from start to finish.
- Mezuzah Project – The director of religious education in the high school, designed a project where students will use a 3D CAD program to design a house floorplan, 3D print the floorplan, and then will research and write a halakhic summary of the Jewish laws that govern the required placement of mezuzot within the house based upon its design. Follow this link to hear a description of the project by Rabbi Soskil.
Interdivisional Projects
There are three interdivisional projects we are currently working on:
- Middle School Coordination – We are currently coordinating with our middle school science teachers to bring the STEM Lab training courses to middle school students, so they can fully participate in the STEM Lab. In addition, we are working with a middle school Judaic Studies teacher with his unit on the Ten Commandments. Students will be given the commandments and asked to make the tablets with our laser cutter/engraver. They will select the location and orientation of the commandments and then discuss their design of the tablets based on their reading of the Old Testament.
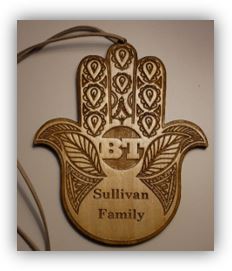
- The Development Office – We recently completed a project for the development office. They wanted to send a token of appreciation to the community members who donated to the STEM Center. We design and laser engraved seventy chamsas. Each chamsa was personalized to the donor family. Follow this link for a time lapse of the chamsas being engraved and cut.
- School Signs and Engraving – The STEM Center offers us the freedom to do make several projects “in-house” that we would otherwise have to contract from a vendor. The first is making signs for the school. Student volunteers work with our facilities department to update signs for the school. They us both the laser engraver and Carvey to make signs. In addition, Our middle school principal, suggested that we personally engrave students’ siddurim, prayer books, with the BT school logo, the student’s name, and the date of his/her bar/bat mitzvah.
Make a Five-Year Plan
Right now, students are largely working on existing designs to plan their projects. As we increase our student training, we plan for students to use Fusion 360 to design their own solutions to their problem and then actually develop unique designs for the projects, making the entire experience that much more student-driven. Moreover, as we continue to expand the number and kinds of technological equipment, we will learn and train more deeply about the power and potential of what we can accomplish with the equipment. The learning experience will be enriched by the depth and expanding knowledge of the equipment.
We are also looking ahead to our five-year plan in which we propose to continue expanding our STEM center to include a designated area for biotechnology and lab-bench research. We have a room adjacent to the STEM center, connected by a door, which is ready and prepared for a proposal design. We hope to implement a similar approach of preparing a proposal based on our learning principles, iterating our draft floor plan based upon the collaborative input of our science department members, securing the funding via grants and donor interests and then moving on to execution.
Entrant Bio(s)
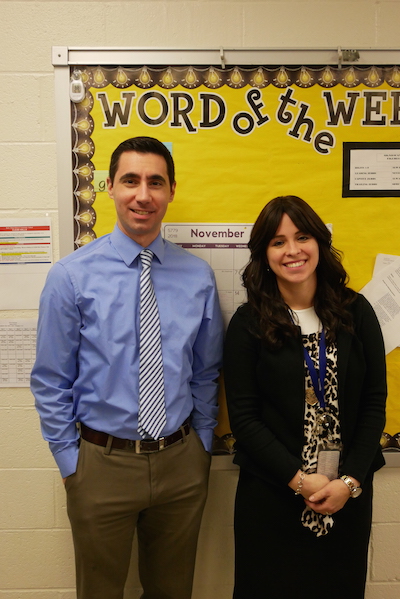
Racheli Daniel
Racheli is a full-time faculty member in both the Science and Judaic Studies departments at Beth Tfiloh. Racheli previously taught high school science at Loyola Blakefield, a Jesuit high school for boys and is currently in her 7th year at Beth Tfiloh, teaching biology, chemistry and Bible. She serves as chair of the Science department and enjoys working on interdepartmental programs and is particularly interested in developing curriculum involving real-world application and hands-on integration.
Vince Bonina
Vince is a full-time teacher at Beth Tfiloh Dahan Community School (BT). Prior to teaching at BT, he developed his love for project-based, student-centered, technology-rich instruction at Johns Hopkins University Center for Talented Youth where he wrote and taught engineering design curriculum for six years. Following that experience, he began teaching at BT. Currently in his fifth year, Vince teaches physics, mathematics, and engineering. He also manages the STEM Center.
This entry has been tagged with the following terms: